So here’s the thing—your garage door opener might look like a tough piece of machinery, all gears and chains and clunky metal. But, weirdly enough, it can get taken down by something as small as a dead battery. Seriously. That tiny coin cell or backup pack tucked inside? That’s the heartbeat. When it’s out, your opener doesn’t just act moody, it flat-out refuses to listen. And then you’re stuck outside pressing the button like it owes you money.
That’s why it’s worth knowing how to change battery in garage door opener before you panic or call a service guy for something you could’ve fixed in five minutes. The battery keeps the remote alive, keeps the keypad glowing, and honestly—it’s the safety net when the power goes out.
Without it, you’re suddenly back to old-school manual lifting. And if you’ve got heavy garage doors (I had a neighbor once who almost slipped trying to yank his up during a blackout), you really don’t want to risk it.
How often should you replace it? Some folks say every year, some stretch it to two or three. Personally, I’d rather swap it the moment I notice the opener hesitating. It’s just easier than being caught in the rain outside your own garage. Stick with me—we’ll go through 10 quick ways to do it right, no stress.
Understanding Garage Door Opener Batteries
Types of Batteries Used in Openers
Okay, not every garage door opener is built the same. Some are fancy with backup systems; others just have a simple remote. Here’s the quick breakdown:
- Coin cell batteries (CR2032, CR2025, that sort of thing): Most common in remotes and visor clips.
- 9V or AA/AAA batteries: You’ll find these in some wall control units or older models.
- Backup system batteries (12V lead-acid types like LiftMaster 485LM or Chamberlain 485LM): These are the bigger ones, hiding inside the main opener housing. They’re the ones that keep working during a power outage.
Pro tip: If you’re not sure which one yours uses, flip through the owner’s manual (yes, the one in the bottom of that junk drawer) or check the little battery compartment cover itself—it usually has the type printed on it.
Signs Your Garage Door Opener Battery is Dying
You’ll usually know before the thing quits completely. Here’s what to watch for:
- The remote takes a few extra clicks before the door moves.
- The LED indicator on your remote or wall control dims or flickers.
- The door opens halfway, stops, then sulks like it’s out of energy.
- In backup systems, you’ll sometimes see a red LED indicator flashing at you.
I once ignored that flicker for weeks, thinking maybe it was just cold weather messing with the battery. Nope. Dead battery. And, of course, it died the night of a storm when I really needed it.
So if you notice any of these—don’t wait. Replacement is cheap, fast, and saves you a bigger headache later.
Preparing to Change the Battery
Before you dive in, it’s worth slowing down for a second. Changing a battery in a garage door opener sounds simple—almost too simple—but if you’re not careful, you can end up stripping a screw, breaking a plastic tab, or worse… putting the wrong battery type in and wondering why nothing works. That’s why prepping matters.
Tools and Items You’ll Need
- A Phillips screwdriver (for remotes with screws or opener covers).
- The correct replacement battery (CR2032 coin cell, garage door opener battery 12v, or whatever your unit requires).
- A clean, soft cloth to wipe contacts.
- Optional: a pair of gloves if you’re dealing with lead acid batteries (like in LiftMaster or Chamberlain backup systems).
Pro Tip: Keep a spare battery tucked somewhere in the house. Not in the garage—because if the door won’t open and the only spare’s inside, you’re stuck.
Safety Precautions
Here’s where people sometimes get lazy, but trust me, it helps:
- Unplug the opener if you’re swapping out a backup battery inside the main unit.
- Handle red and black terminals carefully—don’t force them off.
- Don’t use rechargeable batteries unless the manual specifically says it’s okay (a lot of LiftMaster garage door opener battery units don’t like them).
- If you notice corrosion or buildup, clean it gently with a dry cloth before sliding the new one in.
And to answer a common question: no, you don’t usually have to unplug the opener when changing a garage door opener remote battery. But for bigger backup batteries, yes—unplug it first.
Step-by-Step Guide: How to Change Battery in Garage Door Opener Remote
This is the part most people come for—because let’s be honest, 90% of the time it’s the remote acting up. Whether you’re figuring out how to Change Battery in Garage Door Opener LiftMaster, how to change battery in garage door opener Chamberlain, or even the good old Craftsman remote, the steps are pretty much the same.
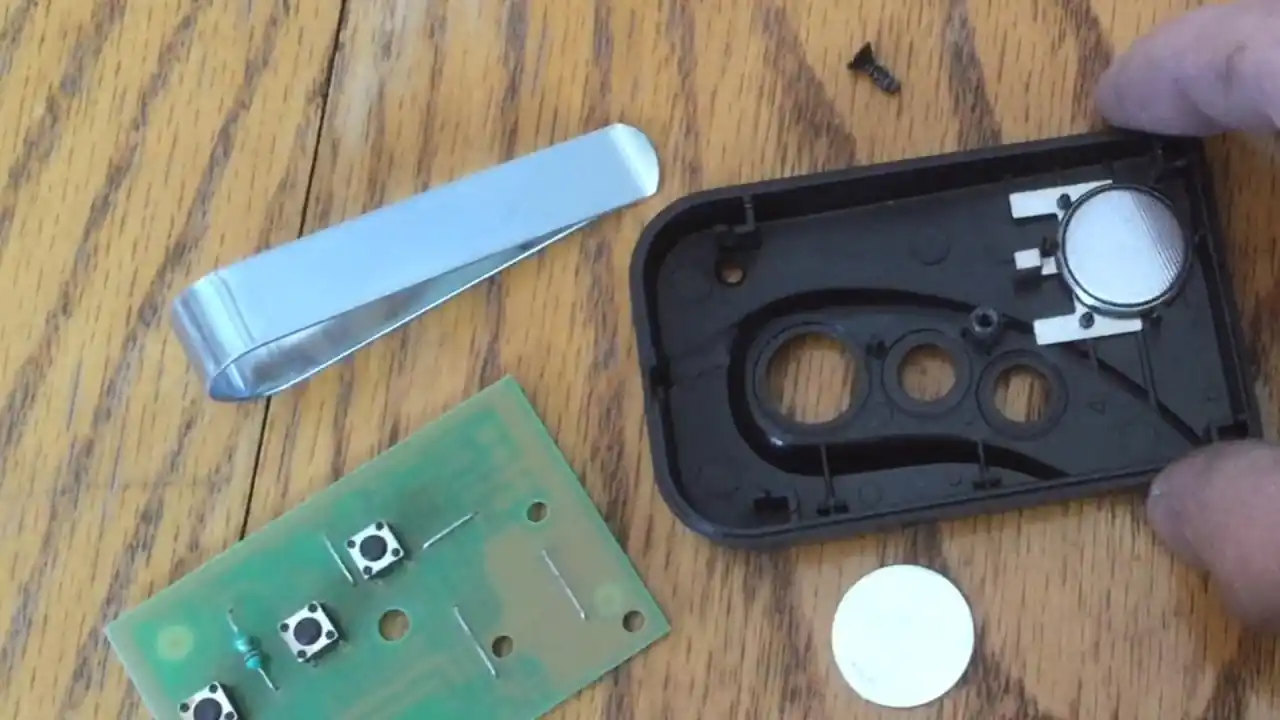
Opening the Remote Case
There are usually two styles:
- Slide cover: You just push the cover down with your thumb, and it pops open.
- Screw-secured case: Use a small Phillips screwdriver to remove the screw on the back before prying it open.
If there’s no visible screw and it doesn’t slide, don’t panic—it probably just snaps open with a little pressure near the seam.
Removing the Old Battery Safely
- Once open, gently pop out the old remote battery.
- Avoid touching the metal contacts with your fingers—they can get oils or moisture on them.
- If the battery is stuck, tap the remote lightly in your palm instead of prying with something sharp.
Inserting the New Battery
- Match the polarity (+/-) with the symbols in the battery compartment.
- Common ones include the CR2032 coin cell or other button batteries, but always check your owner’s manual if unsure.
- For garage door opener remote Chamberlain or remote LiftMaster, the CR2032 is almost always the go-to.
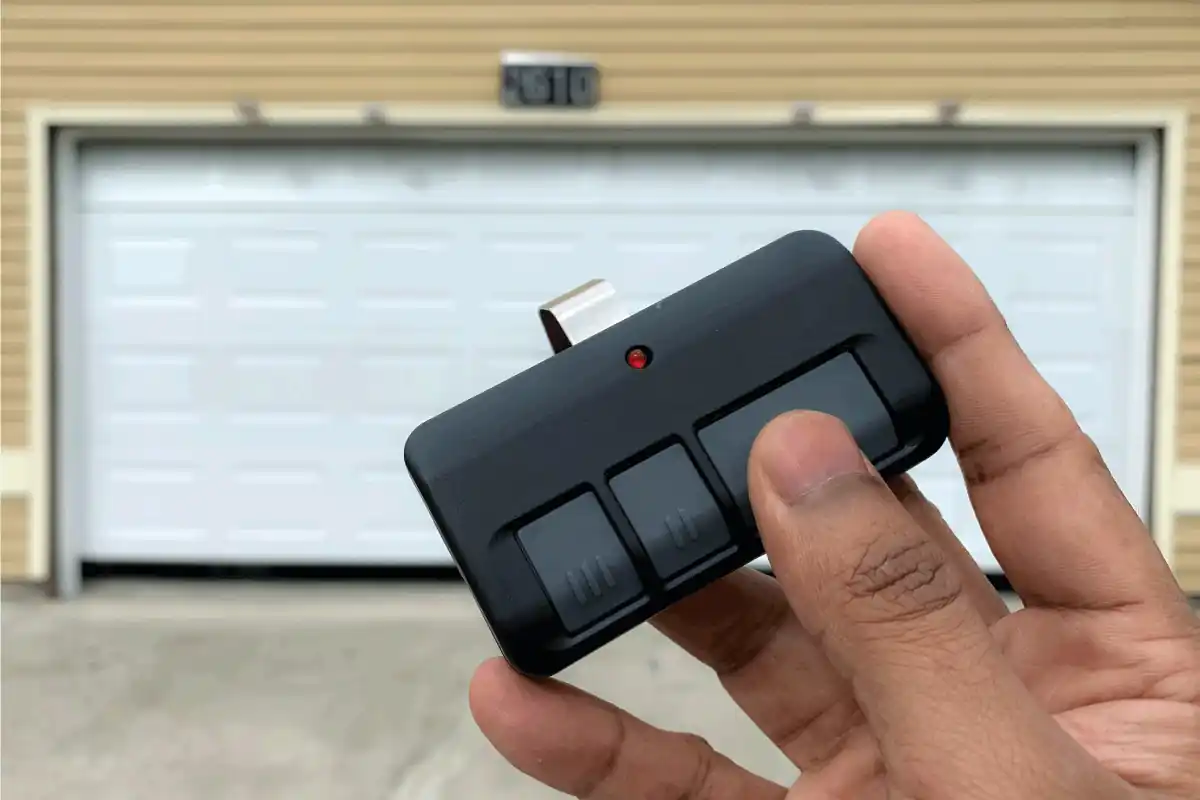
Closing the Case and Testing
- Snap or screw the case shut securely.
- Press the remote button—the LED light should flash strongly.
- Test it both close to the opener and further away (sometimes weak batteries only work within a foot).
Pro Tip: If you’ve changed the battery and it still won’t work, try re-syncing the remote with the opener. It’s rare, but sometimes the memory resets.
Replacing the Wall Unit Battery (If Applicable)
Here’s the thing—not all wall control units even have batteries. A lot of newer ones are powered directly through the opener’s wiring, so you may never need to think about it. But if you’ve got an older Chamberlain wall control or a LiftMaster garage door opener keypad, chances are there’s a tiny battery compartment hidden somewhere in there.
Identifying Battery Location
Usually, the battery slot is tucked right behind a sliding panel or under the cover. For example:
- On some garage door opener keypads, you’ll see a little notch at the bottom—press and slide, and boom, there’s the compartment.
- Others require loosening a screw before the battery compartment cover comes free.
Typical batteries here? A 9V battery, or sometimes a CR2032 coin cell (yep, the same ones used in remotes).
Proper Replacement Steps
- Remove the wall unit or keypad cover.
- Pop out the old keypad battery.
- Insert the new one, making sure the terminals line up (red to +, black to – if it’s a 9V).
- Slide or screw the cover back on.
- Test by pressing a button—if the keypad lights up or beeps, you’re good.
Pro Tip: For how to change battery in LiftMaster garage door opener keypad specifically, use a fresh 9V from a decent brand. Cheap ones die fast, and then you’re stuck outside again, typing your code like it’s the wrong password.
Changing Backup System Batteries in Garage Door Openers
Alright, this one feels a bit more “serious” compared to swapping a coin cell. The backup battery is the big guy—the one that saves you during a power outage. If you’ve got a LiftMaster 485LM or Chamberlain 485LM, you know what I’m talking about.
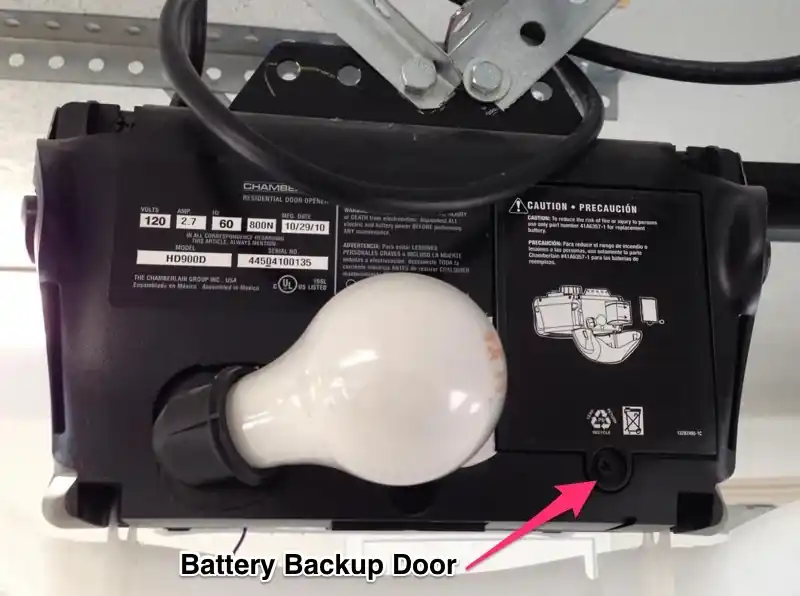
Locating Backup Battery Compartment
Most backup batteries live inside the main opener housing, right behind the light cover or side panel. Sometimes you’ll see a label pointing you there. If not, check the owner’s manual or even the brand’s website.
Replacing Backup Battery
Here’s the step-by-step (and don’t skip the unplug part):
- Unplug the opener from the power supply.
- Remove the light lens or side cover to access the battery compartment.
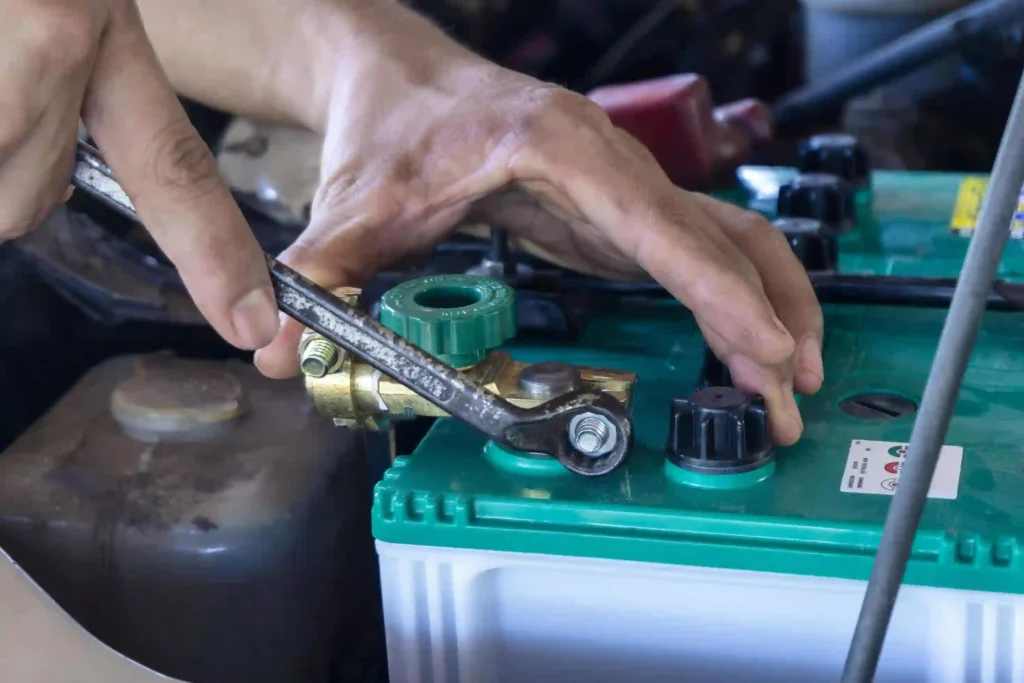
- Disconnect the old lead acid battery from the red and black terminals.
- Slide it out carefully—it can be heavier than it looks.
- Insert the new garage door opener battery 12V (something like Mighty Max Batteries or Interstate Batteries works well).
- Reconnect terminals (red first, then black).
- Put the cover back on and plug the opener in.
Testing Backup Functionality
- Unplug the opener again, just for a test.
- Press the remote or wall control button.
- If the door moves, congrats—the backup battery unit is doing its job.
And no, you shouldn’t replace it with a car battery. I know some folks on Q&A communities like Stack Exchange Network have asked that, but it’s just not the same type of setup. Stick with the recommended battery type for safety.
Pro Tip: Backup batteries usually last 3–5 years. But if you live somewhere with frequent power failures, it’s smart to check the battery life indicator LED once a year. A flashing red light = time to replace.
Troubleshooting After Battery Replacement
Okay, so you’ve done the swap. Fresh battery in, case snapped shut, feeling pretty proud… and then nothing happens. Annoying, right? It happens more often than people admit. Don’t panic yet—usually, it’s something small.
Remote still not working
- First, check if the battery is seated correctly. A loose fit inside the battery compartment can stop contact.
- If you replaced a coin cell like the CR2032, make sure the positive side is actually facing the right direction. It sounds silly, but I’ve flipped mine wrong more than once.
- Try a quick re-sync. Sometimes after replacing the battery in a LiftMaster garage door opener remote or a Chamberlain remote, it forgets its connection. Reprogramming is usually just pressing the “Learn” button on the opener, then clicking your remote.
- If it still fails, clean the contacts gently with a cloth. Dust and corrosion can block the signal.
Opener doesn’t recognize new backup battery
This one’s more common when replacing a bigger 12v garage door opener battery or the LiftMaster 485LM.
- Check the red and black terminals—loose or reversed connections will cause the unit to blink but not work.
- Some units show a red LED indicator for a while after replacement. That doesn’t always mean the new battery is bad; sometimes it needs a few hours to charge up.
- If nothing changes after charging, double-check the voltage. You might have picked the wrong size or a weak one.
Pro tip: Don’t toss the old battery in the trash. Lead acid batteries, like the ones in Chamberlain backup units, should be recycled properly. Most home improvement centers or places like Batteries Plus will take them.
10 Quick Ways how to Change Battery in Garage Door Opener
At this point, we’ve gone step by step, but maybe you just want the fast list. So here’s the condensed cheat sheet—ten quick methods that cover most situations, whether you’re asking how to Change Battery in Garage Door Opener LiftMaster, Craftsman, Chamberlain, or even Genie.
- Slide open the back cover on your remote and swap the coin cell.
- Unscrew the back of the remote, remove the old AAA or AA battery, and replace it.
- Open the keypad compartment, usually at the bottom, and insert a fresh 9V.
- For Chamberlain or LiftMaster backup systems, unplug, open the side cover, and switch out the 12V battery.
- Clean battery terminals before inserting the new one for better contact.
- Use gloves when handling larger backup units to avoid acid residue.
- Reprogram or reset the remote after replacing the battery if the signal fails.
- Check the owner’s manual for the correct battery type before buying—it saves an extra trip.
- Always test both near and far from the opener to make sure the signal is strong.
- Keep an extra remote battery in your car’s glove box or inside the house.
If you’re wondering which is fastest, sliding open the remote and replacing the coin cell takes less than a minute. Backup system batteries take longer, but they’re worth it during a power outage.
Pro tip: Not all universal batteries work for garage door opener remotes. Stick with the right type—CR2032 for most remotes, 9V for keypads, and official replacements like LiftMaster 485LM for backup units.
Pro Tips to Extend Battery Life in Garage Door Openers
Replacing batteries is easy, but stretching their life a little longer? That saves time and hassle. Whether you’re dealing with a garage door opener remote Genie, a Chamberlain keypad, or a LiftMaster backup unit, a few habits make a big difference.
Simple habits to make batteries last longer
- Store remotes in cool, dry places. Leaving them in a hot car shortens coin cell battery life.
- Use high-quality batteries—brands like Duracell or Energizer tend to outlast cheap ones.
- Avoid unnecessary button pressing. Kids love clicking the remote like it’s a toy, and that drains the battery quickly.
- Schedule a quick battery check every 6–12 months. Even if it’s not dead yet, weak batteries can cause signal problems.
- For backup units like the LiftMaster 485LM or Chamberlain 485LM, test the system after storms or power failures to make sure the battery still holds charge.
Pro tip: If you know you won’t be using your garage opener for a while—like at a vacation home—remove the batteries. A CR2032 coin cell left sitting too long can leak and damage the battery compartment.
Final Thought
So here’s the bottom line: learning how to change battery in garage door opener isn’t just about convenience, it’s about avoiding that frustrating moment when the door won’t budge and you’re stuck outside. From swapping a CR2032 in a remote to replacing a full garage door opener battery 12v backup, every step is simple once you know what to look for.
Most of the time, you won’t need a service call. A screwdriver, the right replacement battery, and a couple of minutes is all it takes. But if you’ve swapped batteries, checked connections, and the opener still won’t cooperate, that’s when a professional garage door service might be worth calling.
Next time the opener hesitates, or that little LED light on your remote flickers, don’t wait for total failure. Replace the battery early, keep a spare handy, and you’ll avoid late-night struggles with heavy garage doors during a power outage.
People Might Ask (FAQs)
1. How often should I replace the battery in my garage door opener remote?
Usually once every 1–2 years. If you notice delays, weaker signal, or the LED light dimming, that’s a good sign it’s time. For remotes using CR2032 coin cells, they tend to last a bit longer, but it really depends on how often you use the garage door opener.
2. What type of battery does a LiftMaster garage door opener use?
It depends. The LiftMaster remote often uses a CR2032 coin cell, while the backup unit inside the opener uses a 12v battery like the LiftMaster 485LM. For the LiftMaster keypad battery, a simple 9V is common.
3. How do I change the battery in a Chamberlain garage door opener remote?
Slide or unscrew the cover, pop out the old coin cell, and insert a fresh CR2032. Match the polarity (+/-), snap the cover back, and test. The process is almost identical to changing the battery in a LiftMaster remote.
4. Can I use rechargeable batteries in my garage door opener remote?
It’s not recommended. Rechargeables often have lower voltage than disposable coin cells, which makes remotes less reliable. Stick with standard batteries unless your Chamberlain or LiftMaster manual specifically allows rechargeables.
5. What happens if I don’t replace the backup battery in my opener?
If the power goes out, the opener won’t work. That means lifting heavy doors by hand, which can be unsafe. Backup batteries like the Chamberlain 485LM or Mighty Max Batteries are designed to keep things running smoothly during outages.
6. Do all garage door opener wall controls have batteries?
No. Many newer wall control units get power directly from the opener. But older units or wireless garage door keypads often use either a CR2032 coin cell or a 9V. Check the battery compartment cover to be sure.
7. Why is my garage door opener remote still not working after battery replacement?
Sometimes the garage door opener remote stops working because the battery is inserted wrong, the contacts are dirty, or the wrong type is used. If that happens, try reprogramming or re-syncing it with the Learn button on the opener.
8. How long does a 12v garage door opener battery last?
On average, 3–5 years. But if you live in an area with frequent power failures, it might drain faster. Watch for the red LED indicator—it flashes when the backup battery is low.
9. Where can I buy replacement batteries for my garage door opener?
You can grab them at hardware stores, Batteries Plus, Amazon, or even home improvement centers. For branded replacements like LiftMaster 485LM or Chamberlain 485LM, it’s usually best to order directly from the manufacturer or a trusted seller.
10. Should I call a garage door service just to replace a battery?
Not usually. Changing the battery in a garage door opener remote or keypad is a quick DIY fix. The only time you might want to schedule a service call is if the opener still doesn’t respond after battery replacement, which could point to wiring or circuit issues instead.