How to program Genie garage door opener can be easy, even if it’s your first time. Thanks to new technology and clear instructions, the process is now simpler. You just need to remember some important steps.
These include spotting the indicator lights, getting into the programming mode, and knowing your specific model. With this knowledge, you can easily set up remotes or keypads, or even connect your car without a remote.
This guide will help you through the programming process. It will ensure your Genie opener works well for your convenience and security in 2025.
Key Takeaways
- Discover a simple step-by-step programming process for top Genie garage door opener models in 2025.
- Learn which tools and information you need for setup, including remote control and keypad programming.
- Understand the roles of the learn button, indicator light, and programming mode for effortless operation.
- Find easy-to-follow instructions for different Genie opener types and vehicle integration using HomeLink.
- Get troubleshooting tips for remote control issues, LED light signals, and syncing challenges.
- Ensure a secure, seamless, and user-friendly experience for your home’s garage access system.
Essential Equipment and Resources

For a successful Genie garage door opener programming, gather the right resources. Start with your opener manual for specific instructions and diagrams.
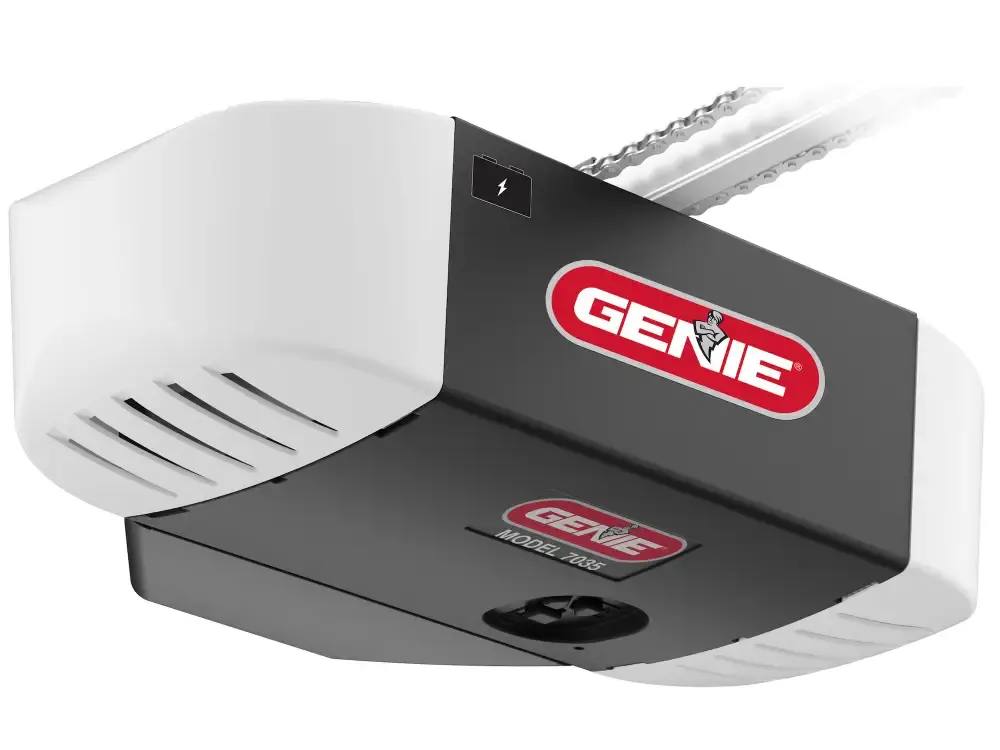
Ensure you have the Genie unit, typically mounted on the garage ceiling, along with the appropriate remote or keypad. Familiarize yourself with the indicator light and learn button, essential for entering programming mode.
Additionally, some simple tools can streamline the process. A small screwdriver may be needed for battery changes or remote access, while a ladder is useful if your opener is high up. If connecting to your car, consult the HomeLink or Car2U guide. Having everything ready will save time and prevent interruptions during programming.
1. List of Tools Needed for Programming
Before you start the setup, be sure to collect all the important tools and documents mentioned in the programming instructions. This will help you complete each step smoothly and quickly. The things you need may vary a little based on your Genie model, but the main tools will be similar for most homes.
Here’s a checklist for an easy setup:
- Genie remote control or Genie keypad (if pairing)
- Garage door opener manual for your specific model
- A ladder to safely reach the opener unit on the garage ceiling
- Small screwdriver for changing the remote batteries
- Fresh batteries for the remote or keypad
- A pen and a notepad to jot down codes if needed
Being organized with the right tools will get you ready for any issues that come up. For example, some Genie models have a square PRGM/SET button and special LED lights.
Knowing their locations before you begin will make the programming instructions easier to follow. Whether you have a premium screw drive unit or a belt drive smart garage door opener, being prepared will help your setup go well.
2. Overview of Genie Garage Door Opener Models
Genie has developed a variety of garage door opener models, each catering to different preferences and setups. Some units stand out for quiet operation, while others are prized for heavy lifting or integrated smart features. Recognizing which model you have is key to following the right programming instructions.
The following table highlights some popular Genie models and their primary features:
| Model Name | Key Features | Drive Type |
| PowerMax | Powerful, reliable | Belt/Chain |
| SilentMax | Ultra-quiet operation | Belt |
| ChainMax | Rugged, affordable | Chain |
| PowerLift | Heavy-duty lifting | Chain |
| TriloG | Smart device compatibility | Belt/Chain |
| IntelliG | Advanced safety, networking | Belt/Chain |
| GPower | Value-focused, compact | Chain |
For households seeking smart technology, the belt drive smart garage door opener models—like TriloG and IntelliG—are particularly popular. Familiarizing yourself with your opener’s characteristics ensures you’ll use the ideal programming process for your specific Genie model.
Beginner’s Guide: How to Program Genie Garage Door Opener

Setting up your Genie garage door opener is easier than you think. You’ll need to find the learn button, know about the different indicator lights, and enter programming mode. This will help you connect it to remotes, keypads, or a HomeLink system. Doing it right gives you quick and secure access just by pressing a button.
This guide will take you through a simple step-by-step process for both garage door opener remotes and built-in car systems. No matter your skill level, you will find easy methods to get your Genie opener working well and integrated smoothly.
3. Step 1: Preparing Your Garage Door Opener

To begin, unplug your garage door opener for safety, then plug it back in to reset the unit and clear internal settings. Next, locate the manual for your model, as it contains specific programming instructions for various Genie openers.
Identify your garage door opener type—common models include PowerMax, SilentMax, and ChainMax, usually featuring a square PRGM/SET button found at the bottom or side of the unit. Familiarizing yourself with key components will aid in setup.
Before proceeding, ensure you have any remote controls or keypads you wish to program nearby. With the opener plugged in and your manual and tools ready, you’re set for an easy programming process.
4. Step 2: Entering Programming Mode
Entering programming mode is an important step for setting up your Genie garage door opener. First, find the learn button. It may say PRGM/SET and is often next to the up and down arrow buttons on the motor unit. This button lets the system accept new commands from remotes or keypads.
To start, press and hold the learn button for two seconds until the small round indicator light turns blue. Then, release the button and wait. You’ll see a long LED light start to flash purple. This means your garage door is in programming mode and ready for signals from your remote control, Genie opener keypad, or vehicle system.
Timing is key: You usually have about 30 seconds to complete the next steps. If the indicator light flashes red, this means the system has timed out. You will need to try again. Getting to know how the LED signals work can help make the programming mode easy and ensure your setup is done correctly every time.
5. Step 3: Syncing the Remote or Keypad

Once your opener is in programming mode, you can connect your remote control or Genie keypad. If you’re using a standard Genie remote, stand about five feet from the opener. Then, press and release the remote button you want to pair slowly. Do this until both the round and long LED lights on the Genie opener flash and then turn off. This shows that you have paired successfully.
To set up a Genie keypad, the steps are a bit different. Start by typing in 3-5-7. Next, press the up/down button and hold the PRGM/SET button until the round LED light turns red. Now, choose your custom pin code. Finish by pairing the keypad and opener following the keypress sequence in your manual.
Keep in mind, you have a limited time to finish these steps. Whether you’re syncing a remote or the keypad, pay attention to the LED indicator lights as your main guide. A stable Genie opener connection lets you access your garage easily and safely at all times.
6. Step 4: Testing the Setup
Testing is very important for your how to program Genie garage door opener. After you sync your remote control or keypad, press the button you programmed to check the system. The garage door should open or close right away. Watch the LED lights on the opener. If the round and long LEDs flash and then go off, this means programming was successful.
If the door doesn’t work as you hoped, check your programming steps again or look at the troubleshooting part of your manual. Some common issues could be remotes out of range, old batteries, or not timing correctly. Doing the steps again and closely watching the flashing LED lights can often fix small setup problems.
Making sure your Genie opener works properly will give you peace of mind. A stable response from your remote or keypad means you set it up correctly. This way, your garage will open easily, and you’ll boost your home security.
Conclusion
Setting up your how to program Genie garage door opener might feel hard at first. But if you have a simple step-by-step guide and the right tools, it becomes easy. By following each step, like getting your device ready and syncing your remote—you can make sure your garage door works well and stays safe.
Also, knowing how to fix problems and learning about different models will help you fully enjoy what your garage door opener can do. Whether you are new to this or want to refresh your skills, this guide gives you the key details for a great setup.
If you have any questions or need help, feel free to check our FAQ section or ask for support. Happy programming!
Frequently Asked Questions
1. How do I troubleshoot a non-responsive Genie garage door opener?
Start troubleshooting by checking the batteries in your remote control. Look for any error signals from the LED lights or the indicator light on your garage door opener. Make sure you followed all the programming steps right. If problems still happen, check your garage door opener manual or think about calling a technician for further help.
2. Can I link more than one remote to my Genie opener?
Yes, you can connect many remote controls or universal remotes to one Genie opener. Just follow the same programming process for every remote button. Be sure to press the learn button and link each device separately for easy use by multiple people.
3. How do I program a Genie garage door opener?
To set up your Genie opener, first go into programming mode. You can do this by pressing the learn button, which has an LED light. Next, push your remote control button. Wait until the LED light flashes and then turns off. This means that the programming instructions worked and your remote is now connected to the Genie opener.
4. How to program a 3 button Genie garage door opener?
To program your Genie 3-button remote, start by entering programming mode using the learn button. You can then set each remote control button for different doors if necessary. Follow the same programming steps for every button you want to sync. Make sure all buttons are recognized in programming mode.
5. How do I reprogram my garage door opener remote?
To reprogram your remote control, start by pressing and holding the learn button or reset button on your Genie opener. When you enter programming mode, follow the steps to connect your remote by pressing its button. Check the LED indicator to make sure the reprogramming worked well.
6. How to program Genie garage door opener to car without remote?
You can use your car’s HomeLink system by following these steps: clear any old settings, then enter programming mode by pressing the learn button on your Genie opener. After that, connect it using the buttons in your car. The process might change a bit with different Genie models, but it will let you access your garage directly from your car without needing a remote.
7. How do I program my Genie remote?
Start by setting your Genie opener to programming mode. To do this, press the learn button until you see the indicator light show it’s ready. Next, press the button on your remote control that you want to program, following the programming steps. Wait until the indicator light confirms that the connection was successful.
8. How do I change the code for my Genie garage door opener?
To set new security settings, press the reset button. This will erase all previous codes. Next, follow the procedure to set up your new code for the Genie opener. This step helps to protect against unauthorized access. It also keeps your opener working well for your overall security service.